기획
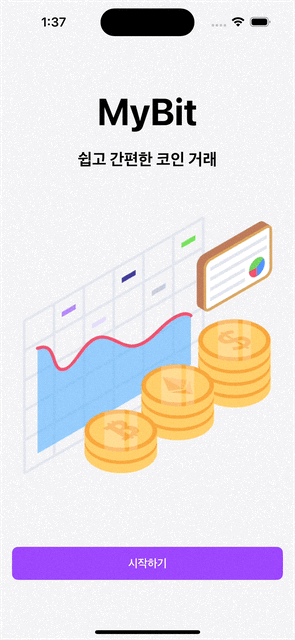
이번 프로젝트에서 앱의 시작부분을 아래 사진처럼 기획 중인데요. 그래서 이번 기회에 이 Bottom Sheet를 구현한 내용에 대해 작성해 보려고 합니다.
Bottom Sheet 만들기
하단 시트 구현
struct BottomSheetView<Content>: View where Content: View {

    @Binding var isPresented: Bool
    private var height: CGFloat
    private var content: Content

    @GestureState private var translation: CGFloat = .zero

    init(_ isPresented: Binding<Bool>, height: CGFloat, content: () -> Content) {
        self._isPresented = isPresented
        self.height = height
        self.content = content()
    }

    var body: some View {
    	//...
    }
}
우선 하단 시트를 위한 구조체를 구현해보겠습니다.
일단 하단 시트를 열어주기 위한 isPresented를 바인딩해주고
하단 시트에서 사용할 View를 지정을 위해 height 변수도 선언해줍니다.
그 다음 하단 시트 내부에 그릴 View를 위한 Content를 선언해 줍니다.
그리고 마지막으로 드래그해서 하단 시트를 닫기 위해 @GestureState를 하나 선언해 줍니다.
여기서 @GestureState는 제스처에 대한 상태를 나타내주는 Property Wrapper입니다.
실제 구현에 대해선 아래에서 더 구현해보도록 하겠습니다.
하단 시트 body View 구현
var body: some View {
    ZStack(alignment: .bottom) {

        Color.black.opacity(0.1)
            .opacity(isPresented ? 1 : 0)
            .onTapGesture {
                // 배경화면 터치 시 하단 시트 dismiss
                isPresented = false
            }

        // ...
    }
    .ignoresSafeArea()
}
위 부분 body View 부분의 가장 바깥쪽 부분인데요.
이부분에서는 유저가 배경화면을 터치 시 하단 시트는 내려갑니다.
var body: some View {
    ZStack(alignment: .bottom) {

       // ...

        VStack(spacing: .zero) {
            RoundedRectangle(cornerRadius: 20)
                .fill(.white)
                .frame(height: 30)
                .overlay(
                    BottomViewGrabber()
                )

            self.content
                .frame(height: self.height)
        }
        .frame(height: self.height+30)
        .background(
            Rectangle()
                .fill(.white)
                // 커스텀 cornerRadius modifier
                .cornerRadius(20, corners: [.topLeft, .topRight])
                .edgesIgnoringSafeArea([.bottom, .horizontal])
        )
        // ...
    }
    .ignoresSafeArea()
}
위 부분 실질적으로 하단 시트 내부에 보여지는 View를 구현한 부분입니다.
이 곳에서 cornerRaidus 라는 custom modifier를 정의하였는데 이 부분에 대해서 하단에 별첨으로 설명하도록 하겠습니다.
var body: some View {
    ZStack(alignment: .bottom) {

        // ...

        VStack(spacing: .zero) {
            // ...

            self.content
                .frame(height: self.height)
        }
        // ...
        .transition(.opacity.combined(with: .move(edge: .bottom)))
        .offset(y: translation)
        .gesture(
            DragGesture()
                .updating($translation) { value, state, _ in
                    if value.translation.height >= 0 {
                        state = value.translation.height
                    }
                }
                .onEnded({ value in
                    if value.translation.height >= height / 3 {
                        isPresented = false
                    }
                })
        )
    }
    .ignoresSafeArea()
}
위 부분은 유저의 제스처에 따른 하단 시트 변화 애니메이션을 정의한 부분입니다.
위 부분에 대해선 좀 더 자세히 설명해보도록 하겠습니다.
.transition(.opacity.combined(with: .move(edge: .bottom)))- .transition(_:) modifier은 뷰가 띄워지거나 사라질 때, 어떤 애니메이선으로 보일지 정의하는 modifier입니다.
- 위 코드에서는 .transition(_:) modifier의 인자(arguement)로 받아진 .opacity는 구조체 AnyTransition 타입을 따르는 타입 프로퍼티입니다. 이 말은 화면이 보여지고 사라질 때 투명도 형태의 애니메이션으로 보여젔다가 사라진다는 의미입니다.
- .opacity와 사용된 .combined(with:) 메서드는 구조체 AnyTransition의 메서드로 다른 transition과 같이 사용하게 해주는 메서드입니다.
- 따라서 실제 transition은 아래와 같이 이루어집니다.
.offset(y: translation)- .offset(x:y:) modifier는 View를 기존 위치에서 x축, y축으로 이동시키는 역할을 합니다.
- gesture(_:including:) modifier는 특정 뷰에 제스처를 등록하는 modifier이다.
- DragGesture()는 이름 그대로 드래그 제스처를 나타냅니다.
- updating(_:body:) 메서드는 Gusture 프로토콜에 정의되어 있는 메서드로 제스처가 발생하는동안 호출되는 메서드입니다.
- onEnded(_:) 메서드도 마찬가지로 Gusture 프로토콜에 정의되어 있는 메서드로 제스처가 끝나면 호출되는 메서드입니다. 여기서 호출 후 수행할 동작에 대해 정의해줍니다.
이제 updating(_:body:) 메서드와onEnded(_:) 메서드에 구현된 내용을 좀더 상세히 살펴보도록 하겠습니다.
.updating($translation) { value, state, _ in
    if value.translation.height >= 0 {
        state = value.translation.height
    }
}- updating(_:body:)의 body 클로저에서 인자로 value, state가 들어오는데 여기서 value는 갱신된 제스처 상태를, state는 이전 제스처 상태를 나타냅니다.
- 따라서 위 코드는 value의 값(드래그된 정도)에 따라 state값을 갱신시켜주는 코드입니다.
- 여기서 value.translation.height >= 0 조건문은 하단 시트가 드래그에 따라 화면 위로 따라가는 현상을 방지해줍니다.

.onEnded({ value in
    if value.translation.height >= height / 3 {
        isPresented = false
    }
})- .onEnded(_:) 메서드의 action 클로저에서 받아오는 인자 value는 제스처의 최종 값을 가져옵니다.
- 위 구문에서 value.translation.hight >= height / 3 조건문은 드래그로 이동한 위치가 전체 높이의 1/3을 넘었을 경우 하단 시트가 닫힌도록 해주는 구문입니다.
최종 코드
import SwiftUI

struct BottomSheetView<Content>: View where Content: View {

    @Binding var isPresented: Bool
    private var height: CGFloat
    private var content: Content

    @GestureState private var translation: CGFloat = .zero

    init(_ isPresented: Binding<Bool>, height: CGFloat, content: () -> Content) {
        self._isPresented = isPresented
        self.height = height
        self.content = content()
    }

    var body: some View {
        ZStack(alignment: .bottom) {

            Color.black.opacity(0.1)
                .opacity(isPresented ? 1 : 0)
                .onTapGesture {
                    isPresented = false
                }

            VStack(spacing: .zero) {
                RoundedRectangle(cornerRadius: 20)
                    .fill(.white)
                    .frame(height: 30)
                    .overlay(
                        BottomViewGrabber()
                    )

                self.content
                    .frame(height: self.height)
            }
            .frame(height: self.height+30)
            .background(
                Rectangle()
                    .fill(.white)
                    .cornerRadius(20, corners: [.topLeft, .topRight])
                    .edgesIgnoringSafeArea([.bottom, .horizontal])
            )
            .transition(.opacity.combined(with: .move(edge: .bottom)))
            .offset(y: translation)
            .gesture(
                DragGesture()
                    .updating($translation) { value, state, _ in
                        if value.translation.height >= 0 {
                            state = value.translation.height
                        }
                    }
                    .onEnded({ value in
                        if value.translation.height >= height / 3 {
                            isPresented = false
                        }
                    })
            )
        }
        .ignoresSafeArea()
    }
}
여기까지 포스트를 읽어주셔서 감사합니다.
참고 사이트
https://iosangbong.tistory.com/14 (주 참고 사이트)
https://velog.io/@juneyj1/SwiftUI%EC%97%90%EC%84%9C-%ED%8A%B9%EC%A0%95-%EB%AA%A8%EC%84%9C%EB%A6%AC%EB%A7%8C-%EB%91%A5%EA%B8%80%EA%B2%8C-%EB%A7%8C%EB%93%A4%EA%B8%B0 (Corner Radius Custom Modifier)
'TIL' 카테고리의 다른 글
| [TIL] Keychain 적용기 (0) | 2024.06.13 |
|---|---|
| [TIL] Moya 라이브러리 Plugins Logging 도입기 (0) | 2024.06.12 |
| [TIL] SwiftUI 시작화면 제작기 (0) | 2024.06.10 |
| [TIL] Custom Modifier 적용기 (0) | 2024.06.09 |
| [TIL] SwiftUI 나머지 영역 차지 하기 (0) | 2024.06.09 |


